
Soil health is so important, and organic fertilizers or soil amendments are a big part of that. If you’re a regular reader, you know I harp on about building soil health a lot and how your soil is the foundation of all your plant-growing endeavors. Because it’s true. I can’t overstate the importance of nurturing your soil. I could talk about natural fertilizers and soil amendments all day long.
You don’t need nasty chemical fertilizers. You can do it naturally, easily, and inexpensively. I’ve put together 23 organic fertilizer options you can make at home to keep your vegetable garden thriving and eco-friendly.
Organic fertilizers play a crucial role in maintaining the health and productivity of your garden. They not only nourish your plants but also improve soil health, which is essential for sustainable gardening. And making your own organic fertilizer is super cost-efficient.
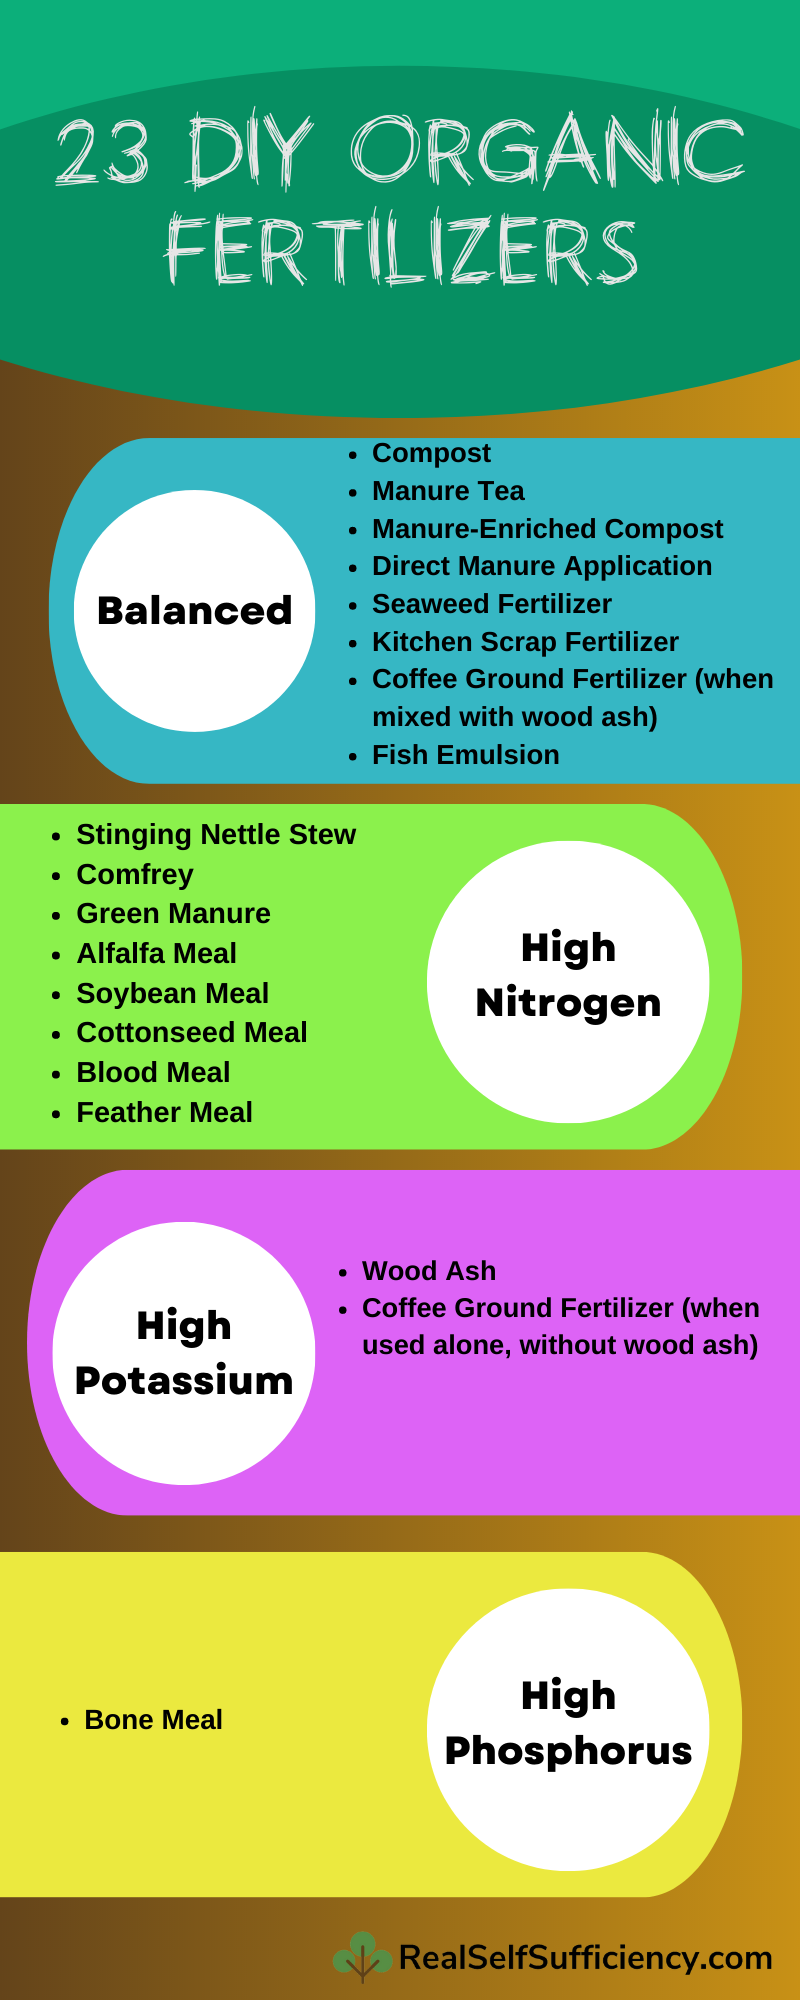
Some of the natural organic fertilizer options I’ve included here are balanced for generally boosting the health and nutrition of your soil. Others are high in nitrogen, phosphorous, or potassium and are amendments you can add when you have a specific deficiency.
Once you start making your own fertilizer, you’ll see how easy and effective it is, and you won’t go back to those over-priced commercial options (although there are a couple of recommended alternatives toward the end of this post).
Liquid Organic Fertilizer
Liquid organic fertilizers are an excellent way to provide your plants with a quick boost of nutrients. They’re easy to make and apply, ensuring your plants get the nourishment they need when they need it.
1. Stinging Nettle Stew

Stinging nettle stew is a potent liquid plant food you can make at home. Also known as nettle tea, this is probably the easiest natural fertilizer you can make, and you most likely have the ingredients right there on your property.
This DIY organic fertilizer is rich in nitrogen, which promotes healthy growth and lush foliage.
To make stinging nettle stew, follow these steps:
- Collect stinging nettles: Carefully harvest stinging nettles from your garden or nearby areas. Wear gloves and long sleeves to protect yourself from the plant’s irritating hairs.
- Prepare the container: Find a large bucket or barrel with a lid or cover to contain the odors during the steeping process.
- Fill the container with nettles: Place the collected nettles in the container, filling it as much as possible. The more nettles you add, the stronger the fertilizer will be. Be sure to remove the roots and avoid seed tops to prevent unwanted growth.
- Add water: Fill the container with water, completely covering the nettles. The water will extract nutrients from the nettles during the steeping process.
- Steep the nettles: Cover the container and let the nettles steep for two weeks. Stir the mixture every other day to help release nutrients and encourage decomposition.
- Strain and dilute: After two weeks, strain the mixture through a fine mesh or cheesecloth to remove the solid plant matter. The remaining liquid is your concentrated stinging nettle stew. Dilute the stew with water before applying it to your plants. The dilution ratio depends on the strength of your initial mixture. If you packed the container with nettles, start with a 1:10 ratio (one part nettle stew to ten parts water).
- Apply to plants: Use the diluted stinging nettle stew to water your plants, focusing on the root zone. You can also use it as a foliar spray, ensuring it’s well-strained to avoid clogging the spray nozzle.
2. Comfrey Liquid Fertilizer

I love comfrey (Symphytum officinale). It just has so many uses, aside from DIY plant fertilizer and comfrey tea. Comfrey is rich in potassium, which helps with flower and fruit development. One of its most valuable applications is as a liquid fertilizer, which is rich in nutrients, particularly potassium. Potassium is essential for flower and fruit development, as well as overall plant health and vigor.
I love comfrey. It just has so many uses, aside from DIY plant fertilizer. Comfrey is rich in potassium, which helps with flower and fruit development.
To make comfrey liquid fertilizer, follow these steps:
- Harvest comfrey leaves: Choose healthy comfrey plants and harvest their leaves. It’s best to collect leaves during the plant’s active growth period in spring and summer. Be sure to wear gloves, as comfrey leaves can be slightly prickly.
- Chop the leaves: Coarsely chop the harvested comfrey leaves to increase their surface area and speed up the fermentation process.
- Prepare the container: Find a suitable container, such as a bucket or barrel, with a lid or cover to minimize odors during the fermentation process.
- Soak the leaves: Place the chopped comfrey leaves in the container and fill it with water, ensuring that the leaves are fully submerged. The ratio of leaves to water should be about 1:2 (one part leaves to two parts water).
- Ferment the mixture: Cover the container and let the comfrey leaves soak in water for two to three weeks. Stir the mixture occasionally to help release nutrients and encourage fermentation.
- Strain and dilute: After the fermentation period, strain the mixture through a fine mesh or cheesecloth to remove the solid plant matter. The remaining liquid is your concentrated comfrey liquid fertilizer. Dilute the fertilizer with water at a ratio of at least 1:10 (one part comfrey liquid to ten parts water) before applying it to your plants.
- Apply to plants: Use the diluted comfrey liquid fertilizer to water your plants, focusing on the root zone. You can also use it as a foliar spray to provide nutrients directly to the leaves. Make sure to strain it well to avoid clogging the spray nozzle.
3. Manure Tea

Manure tea is a nutrient-rich liquid fertilizer made by steeping livestock manure in water. This (stinky) homemade fertilizer tea is an excellent organic option for providing a wide range of essential nutrients, including nitrogen, phosphorus, and potassium, that promote overall plant health, boost growth, and improve yields. It’s a simple tea fertilizer that’s well-balanced, and, as with all the choices on this list, far better for you and your garden than synthetic fertilizer.
To make manure tea, follow these steps:
- Collect manure: Choose livestock manure from animals like goats, pigs, chickens, cows, horses, rabbits, or guinea pigs. Ensure the manure is well-rotted, as fresh manure can contain harmful pathogens or burn your plants.
- Prepare the sack: Place the manure inside a porous bag, like a hessian or burlap sack. Make sure the bag allows water to pass through while keeping the manure contained.
- Steep the manure: Submerge the sack filled with manure in a large container or water butt. Fill the container with water and cover it with a lid to minimize odors. Leave the mixture to steep for at least a week, stirring occasionally to encourage nutrient release.
- Strain and dilute: After steeping, remove the sack of manure from the container. The remaining liquid is your concentrated manure tea. Dilute the tea with water at a ratio of at least 1:10 (one part manure tea to ten parts water) before using it on your plants.
- Apply to plants: Use the diluted manure tea to water your plants, focusing on the root zone. You can also use it as a foliar spray, but be sure to strain it well to avoid clogging your spray nozzle.
Manure tea is a versatile natural organic fertilizer that can be used on various plants, including vegetables, fruits, flowers, and ornamentals. Regular application throughout the growing season will help support strong, healthy growth and improve your garden’s overall productivity. Remember to always use well-rotted manure and practice proper hygiene when handling and applying manure tea to minimize the risk of pathogens.
4. Seaweed Fertilizer

Seaweed fertilizer is a fantastic DIY organic fertilizer option for those with access to a beach.
Seaweed is rich in trace elements and plant growth hormones that encourage healthy plant development. And it gives you an excuse for a fun trip to the beach!
Note that you can also dry the seaweed in a dehydrator or just in the sunshine and use at a later date. It doesn’t matter too much whether you use fresh or dried seaweed fertilizer.
To make seaweed fertilizer, follow these steps:
- Collect seaweed: Head to the beach and gather as much seaweed as you can find. Remember to follow local regulations and ensure that you have permission to collect seaweed if necessary.
- Rinse and soak the seaweed: Before using seaweed as a fertilizer, it’s essential to rinse it thoroughly to remove any salt and sand residue. Then, soak the seaweed in fresh water for at least 24 hours, giving it a good “swish” under the water to help remove any lingering salt.
- Create seaweed tea (optional): If you prefer a liquid fertilizer, place the soaked seaweed in a large container, cover it with water, and let it steep for a few days. Afterward, strain the mixture and dilute the resulting seaweed tea with water before applying it to your plants.
- Apply seaweed directly to the soil: Another option is to mix the soaked and rinsed seaweed directly into your garden soil. This method adds nutrients and organic matter to the soil, which improves its structure and water retention.
- Dry and store seaweed for later use: If you have excess seaweed, you can dry it in a dehydrator or under the sun for later use. Dried seaweed can be crushed and sprinkled around plants or rehydrated to make seaweed tea.
Solid Organic Fertilizer
Solid organic fertilizers are a great way to improve your soil’s structure and provide long-lasting nutrients for your plants. Incorporating these fertilizers into your soil will result in healthier, more productive plants and better-draining, loose, airy soil. The solid options break down over time, adding valuable organic matter to your soil to improve its structure, nutrient profile, microbial life, and overall health and composition.
5. Manure-Enriched Compost

Manure-enriched compost is an easy way to give your plants a nutrient boost. Simply add manure to your compost pile and let it decompose along with other organic materials. When the compost is ready, apply it to your garden beds as a natural, nutrient-dense amendment.
To make manure-enriched compost, follow these steps:
- Choose the right manure: Select manure from livestock like cows, horses, chickens, rabbits, or goats. Make sure the manure is aged or well-rotted to avoid introducing harmful pathogens or weed seeds into your compost pile.
- Add manure to your compost pile: Layer the manure with other organic materials, such as kitchen scraps, garden waste, and leaves. A good rule of thumb is to mix one part manure with two parts other organic matter. This helps maintain the balance of nitrogen-rich (manure) and carbon-rich (other materials) components.
- Turn the compost regularly: Regularly turn your compost pile to ensure that the manure and other materials decompose evenly. This also helps aerate the pile, which speeds up the decomposition process and prevents foul odors.
- Monitor the compost’s progress: Check the temperature and moisture level of your compost pile. It should be warm or hot to the touch, indicating that the decomposition process is working effectively. If the pile is too wet or too dry, adjust the moisture level by adding water or dry materials accordingly.
- Harvest and use your manure-enriched compost: Once your compost has reached a dark, crumbly consistency, it’s ready to use. Apply the manure-enriched compost to your garden beds as a soil amendment, side dressing, or top dressing. This will provide your plants with a nutrient boost and improve the overall health of your garden.
6. Direct Manure Application
Direct manure application involves adding aged manure directly to your garden beds. Make sure the manure is well-rotted before applying it to your soil, as fresh manure can burn your plants. This method provides a powerful dose of nutrients to your garden, promoting healthy growth and high yields.
You can also add fresh manure to your beds in fall, after you’ve harvested the last crops and turned the soil, ready for winter. That way, the manure breaks down naturally over winter, before you plant in spring.
Most people use pig, horse, cow, or chicken manure for your homemade fertilizer recipes, but you can also use rabbit, guinea-pig, turkey, bison, or whatever manure you have access to from other livestock.
7. Green Manure
Green manure refers to fast-growing plants that are grown and then turned into the soil to improve its structure and nutrient content. To use green manure, sow seeds of plants like clover, rye (not if you or someone you regularly feed has a gluten sensitivity), or buckwheat, and then turn them back into the soil once they’ve grown.
This method helps add valuable nutrients back into the earth, improves soil structure, and prevents erosion. Plus, using ground cover helps to prevent weeds taking hold.
8. Kitchen Scrap Fertilizer

Kitchen scrap fertilizer is a fantastic way to recycle your food waste and provide your plants with essential nutrients. To make this fertilizer, dig a trench in your garden bed, place a layer of crumpled newspaper at the bottom, add a layer of vegetable scraps and peelings, and cover it with soil. As the scraps decompose, they’ll release nutrients into the soil, helping your plants thrive.
Composting in place is one of my favorite methods of building soil health and making homemade plant food, because it’s just so easy. It takes barely any effort and doesn’t cost a penny.
9. Coffee Ground Fertilizer

Coffee ground fertilizer is an easy DIY organic fertilizer you can make by mixing used coffee grounds with wood ash. This mixture is rich in potassium, nitrogen, calcium, and phosphorous, which are essential for plant growth. Apply the coffee ground fertilizer to the base of your plants or mix it into your soil.
Composting Methods
Composting is a fantastic way to recycle organic waste and create nutrient-rich soil amendments for your garden. Let’s explore some different methods of composting.
10. Traditional Composting
Traditional composting involves creating a compost pile or bin and adding layers of organic materials, such as kitchen scraps, leaves, and grass clippings. Turn the pile regularly to aerate it and speed up decomposition. Once the compost is ready, use it to amend your garden beds for a nutrient boost.
Don’t forget to sign up to our newsletter to get our free composting guide!
11. Vermicomposting

Vermicomposting, or worm composting, is a method that uses worms to break down organic materials into nutrient-rich vermicompost. Set up a worm bin with bedding materials, add composting worms, and provide them with kitchen scraps to eat. Harvest the vermicompost and use it as a nutrient-dense soil amendment for your garden.
12. Bokashi Composting

Bokashi composting is a fermentation process that uses beneficial microbes to break down organic waste.
Start by adding kitchen scraps to a bokashi bucket, sprinkle bokashi bran over them, and continue layering until the bucket is full. After a couple of weeks, the fermented waste can be buried in the garden, where it will further decompose and release nutrients into the soil.
Soil Amendments and Conditioners
Soil amendments and conditioners improve the structure, texture, and nutrient content of your garden soil. Let’s explore some options for enhancing your soil with these materials.
13. Biochar
Biochar is a form of charcoal that you can add to your soil to improve its structure and water retention. To make biochar, burn organic materials, such as wood or plant waste, in a low-oxygen environment.
Mix the resulting char into your soil to enhance its fertility and promote plant growth.
14. Wood Ash
Wood ash is a byproduct of burning wood and you can use it as a soil amendment. It’s rich in potassium and other minerals that promote plant growth. Sprinkle wood ash around your plants or mix it into your soil to provide a nutrient boost.
And, it has an added bonus: Mice and other little rodent pests won’t touch it. So if you’re direct sowing a crop like field beans or peas that mice just love to steal before germination, sprinkle some wood ash over the top of the soil. Problem solved!
Important: Make sure you only use plain, untreated wood. You do not want to put wood ash contaminated with chemicals from pressure treatment, stains, or paint into your soil. These kinds of contaminants can damage your soil health and have the potential to leech into the groundwater and into any crops you grow in the soil.
15. Crushed Oyster Shells
Crushed oyster shells are a calcium-rich soil amendment that can help improve soil structure and prevent nutrient deficiencies in plants.
To use crushed oyster shells, simply mix them into your soil or sprinkle them around the base of your plants.
16. Leaf Mold
Leaf mold is a fantastic soil conditioner made from decomposed leaves. To make leaf mold, collect fallen leaves and create a pile or place them in a large bin. Keep the leaves moist and turn the pile occasionally.

After a year or two, the leaves will break down into a dark, crumbly substance that can be used to improve your soil’s structure and water retention. This is a brilliant garden fertilizer that costs you nothing but a little time.
Plant-Based Organic Fertilizer
Plant-based organic fertilizers are a sustainable way to provide your garden with the nutrients it needs. Let’s look at some options you can make at home.
17. Alfalfa Meal
Alfalfa meal is a nutrient-rich plant-based fertilizer made from ground alfalfa leaves. It’s high in nitrogen, phosphorus, and potassium, making it an excellent all-around fertilizer. To use alfalfa meal, simply mix it into your soil or sprinkle it around your plants.
18. Soybean Meal
Soybean meal is a byproduct of soybean processing and can be used as a plant-based fertilizer. It’s high in nitrogen, making it perfect for promoting leafy growth. Mix soybean meal into your soil or apply it as a top dressing to give your plants a nutrient boost.
19. Cottonseed Meal
Cottonseed meal is a byproduct of cotton processing and is another excellent plant-based fertilizer option. It’s rich in nitrogen, phosphorus, and potassium, making it an effective all-purpose fertilizer. Apply cottonseed meal to your garden beds by mixing it into the soil or using it as a top dressing.
Animal-Based Organic Fertilizer
Animal-based organic fertilizers are a nutrient-dense way to provide your garden with the essential elements it needs to thrive. Here are some options you can use in your garden. While you can make your own animal-based natural fertilizers because it’s a great way to ensure no part of an animal is wasted, I must confess that I don’t. My dogs and cats eat a species appropriate raw diet, often whole prey-style, so we don’t have a tonne of leftovers by the time I’m finished processing an animal carcass. So, I buy these important soil amendments, as they’re really very cost-effective.
20. Fish Emulsion
Fish emulsion is a liquid fertilizer made from the byproducts of fish processing. It’s rich in nitrogen, phosphorus, and potassium, as well as trace elements. To use fish emulsion, dilute it with water according to the package instructions and apply it to your plants’ foliage or roots.
21. Blood Meal
Blood meal is a powdered fertilizer made from dried animal blood. It’s high in nitrogen, making it ideal for promoting leafy growth. To use blood meal, mix it into your soil or apply it as a top dressing around your plants.
22. Bone Meal
Bone meal is a powdered fertilizer made from ground animal bones. It’s high in phosphorus and calcium, which help promote strong root development and healthy blooms. Mix bone meal into your soil or apply it as a top dressing around your plants.
23. Feather Meal
Feather meal is a powdered fertilizer made from ground poultry feathers. It’s high in nitrogen, making it ideal for promoting leafy growth. To use feather meal, mix it into your soil or apply it as a top dressing around your plants.
Whether you’ve got alkaline soil or acidic soil, you can condition and balance it with a combination of these natural garden fertilizers. Homemade fertilizer helps you save money, build healthy soil, and helps you grow healthy plants, whether you’re growing peppers and tomato plants, root vegetables, soft fruit, stone fruit, or something else.
FAQs
What’s the best organic fertilizer for plants?
To determine the best organic fertilizer for your plants, start by conducting a soil test. A soil test will reveal the nutrient levels in your soil and help you identify any deficiencies. Based on the results, you can choose the appropriate natural fertilizer recipes to meet your plants’ specific needs.
Can I use more than one of these fertilizers?
Yes, you can use multiple types of organic fertilizers in your garden. In fact, combining different homemade fertilizers can help provide a balanced nutrient supply to your plants. Be sure to apply the fertilizers according to their recommended rates to avoid over-fertilizing.
Are organic fertilizers safe?
While organic plant fertilizers are generally considered safe, some precautions should be taken. For instance, when using animal-based fertilizers like manure or blood meal, make sure they are well-rotted or processed to reduce the risk of pathogens. Always wear gloves when handling organic fertilizers, and wash your hands thoroughly after use.
How often should I apply organic fertilizer?
The frequency of applying organic fertilizer depends on the type of fertilizer and the specific needs of your plants. Some homemade organic fertilizer, like compost or manure-enriched compost, can be applied once or twice a year. Liquid fertilizers, such as fish emulsion or seaweed fertilizer, may need to be applied more frequently throughout the growing season. Always follow the instructions on the packaging or consult gardening resources for the specific fertilizer you’re using.
Can I use organic fertilizer on indoor plants?
Yes, you can use many organic fertilizers on indoor plants. After all, healthy soil is important for indoor plants, too, and they benefit from soil conditioner, natural slow-release fertilizer, or homemade compost just as much, to more so, even, than outdoor plants.
However, be aware that some organic fertilizers, like fish emulsion or manure, may have a strong odor. For indoor plants, consider using odor-free alternatives like worm castings, compost tea, or liquid seaweed fertilizer.
How should I store homemade fertilizer?
Store leftover organic fertilizers in a cool, dry place, away from direct sunlight. Make sure the storage area is well-ventilated and inaccessible to children and pets. Liquid organic fertilizers should be stored in airtight containers to prevent spoilage, while dry organic fertilizers can be stored in sealed bags or containers. Always follow the storage instructions provided on the packaging, if available.
I originally posted this on RealSelfSufficiency.com, my old homesteading blog, but it really does belong here, too.